So, you are relatively new to the world of hi-fi audiophile record collecting and are still seeking some turntable setup ideas to get up and running? Or, perhaps you already have a setup of your own and are looking to refresh your memory with regards to the various aspects of a turntable and, thus, revitalize your own setup anew?
Whatever your reason for being here, today we will be exploring in relative detail the in’s and out’s of the turntable so that you might rethink your own individual parts and how they all come together to form a cohesive whole.
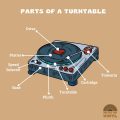
Parts of the Turntable
So, before we move on to the holistic turntable setup ideas at play whenever we install a new stereo system, we must first come to understand the various individual parts of a more extensive setup like this. If we can come to understand a setup in its most complex state, we can then understand anything that comes before, from the most rudimentary all in one record players right up to the most complex and unwieldy displays hi fi audio equipment. Getting to know each individual piece of the record playing experience can only be a positive going forward.
The Plinth
Otherwise referred to as the support for the turntable, the plinth is one of the central turntable setup ideas, for its role is integral in maintaining a sanctimonious listening experience. Though it might not have an obvious impact on the sound itself, the sound of the record being played would be drastically different without the influence of the plinth upon which the turntable is stood.
There are countless external vibrations going on around you at all times, some large and some small, and they can all have an impact on the turntable’s spinning of records to a greater or lesser extent, knocking the needle off kilter and sending it jumping all over the place.
This is where the plinth comes in, absorbing these external vibrations to the best of its ability so that the work of the turntable is as unaffected as it can be by these troublesome extraneous vibrations, large and small. Some turntables even extend the plinth’s role by having adjustable feet to account for the sloping of the surface upon which the entire unit is set, in the eventuality that it can’t be placed on an entirely level surface.
Platter
So, if the plinth is that which absorbs the external vibrations that infect an atmosphere and seek to send the turntable and its needle off kilter, the platter is that which the plinth is attempting to protect in the first place.
The turntable platter’s job might seem incredibly simple, because it kind of is, but it is no less important or integral to the process because of this, and is in fact far more important as a result. The turntable platter is the disc upon which you place any and all of the discs that you wish to play.
It is circular, in mimicking the shape of the discs that it is built to accommodate and work alongside. Most will come fitted with a mat – referred to in the biz as a ‘slipmat‘ – usually made of rubber or felt, which fulfil a dual purpose of absorbing more vibrations that the plinth felts and feelers might miss, but also can be a great way to advertise further the brand of the audio equipment and / or one’s own musical leanings. Since the platter itself is either made from a coarse metal or plastic disc surface, the slipmat will be entirely necessary to protect the discs themselves from scratches and deterioration before their time.
The Drive – Belt and Direct
As with the rest of the elements already described in this article about turntable setup ideas, the drive will be integral in actually getting things working. The drive is the part of the turntable that sends the turntable platter spinning, one of the turntable setup ideas wholly dedicated to motion.
There are two types of drive commonly used in most turntables, those being the belt drive and the direct drive. The former is the older of the two, comprising a rubber belt drive that mechanically and physically transfers the motion of the motor to the platter, spinning it at a more or less consistent speed.
The latter, the direct drive, is a newer invention, coming about as a result of the rise of disc jockeys and ‘scratching’. In a direct drive, the motor and drive are more or less one, meaning that the gap between stopping and starting of the turntable platter is almost completely negligible.
Both have their own advantages, of course. The belt drive is far better at absorbing more vibrations with its rubber belt, whereas the direct drive is better at that which it was built to do, stopping and starting with ease.
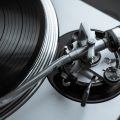
Tonearm
Just as with all those other aspects aforementioned in this article about turntable setup ideas, the tonearm is no less important, acting as the conduit and carrier of the all important needle / stylus. The proper calibration of the tonearm is one of the most integral aspects of more high end and boutique turntable setup ideas.
Some more modern turntables, particularly those that are part of a smaller, cheaper, all-in-one record player, will not include the option of calibrating the tonearm, which can very easily lead to a much faster deterioration of one’s record collection, far before it might otherwise have lasted. Any proper turntable worth its salt, however, will be sure to include these settings, so that the tonearm can properly exact pressure on the surface of the record and through its grooves rather than over-exerting itself and wearing it away to the core.
The tonearm can just as easily veer too much to the left or right as it can exert too much pressure on the record itself, which is where anti-skate measures come in, at least on more expensive models of a turntable, or those from the golden age of vinyl recording technology, a time when no one thought to ask ‘when were record players popular‘.
Cartridge
Working in direct contact with the tonearm, the cartridge is connected to it at the end, containing the stylus or ‘needle’, that which reads the information imbibed within the micro-grooves on the record’s surface. Needless to say, this is a pretty big deal, arguably one of the most important parts of the turntable as a whole, being the component that comes into direct contact with the disc and translates grooves into grooves.
As the turntable platter aforementioned spins the record which is sat upon it, the vibrational data imbued within the micro-grooves of the record are read and travel through the stylus into the cartridge, wherein there are coils arranged in a magnetic field that convert this kinetic and vibrational energy into an electrical signal.
The stylus itself is more often than not constructed from a very small piece of diamond – ‘diamond tipped’ as they say – which is attached to a flexible and ductile metal strip. Though diamond tips are the most common choice of conductor, there are also styluses that come fitted with tips of ruby, sapphire, boron, and carbon fiber, amongst a whole host of other materials.
Whatever the material the manufacturer decides to use, it has to be durable, for it is going to be charged to theoretically withstand hundreds of hours of play, travelling a symbolic panoply of miles across the world, trekking and tracing the contours of dozens of different cultures and socio political contexts. Hence, why it is more often diamond and other such precious metals that are called upon to do the job of crowning turntable setup ideas.
Pre Amp
So, since we are more or less following the sequence of the turntable chronologically and hierarchically, we will end with the final component which the musical signals will be passing through before being handed over to a separate amplifier / stereo system for further processing, and then finally out through the speakers of headphones of the user’s choice.
Thus, the pre amplifier (otherwise known as the phonostage) does exactly what it says on the tin, amplifying the electrical signals as absorbed and transmitted by the cartridge and boosting it so that you can actually hear it when it comes out of the speakers. Without this stage of the process, the stereo system would have to be doing a whole lot of extra work afterwards, for the signal as picked up by the cartridge is incredibly weak and quiet.
Nowadays, in the realm of turntable setup ideas, most record players you are likely to come across (at least those produced this side of the millennium) will come installed with a pre amplifier within the mechanisms. This is at least the case for consumer turntables, such as those someone on more of a budget might purchase to fill out their stereo setup.
However, those turntables occupying the higher end of the audiophile spectrum will more often than not require the user to purchase a separate pre amplifier, such as you might have needed to in years of yore. A housemate of mine chooses to follow such a path, using an antiquated Marantz turntable alongside a Technics amplifier routed out to a pair of external speakers. I, however, use a more modern setup, with a Sony turntable and an Aiwa stereo and Aiwa speakers, mostly because I inherited them from a relative.
And these are just a couple of the many turntable setup ideas available to you, humble reader!
How to Use the Turntable: A Quick Guide
- Grab the disc you are going to play and remove it from the sleeve / jacket that it is currently in. If there is already another disc on the turntable already, make sure to return it to its rightful sleeve first.
- Place the chosen record onto the turntable platter, once you have of course removed a record that might still have been inhabiting it.
- Lift the stylus into the air, which, in the case of almost any turntable that you are presently using, will set into motion the the motor mechanisms within, as well as the belt drive or direct drive working its magic in there. Here, the turntable platter will be performing its primary function, to spin the record at a correct and consistent speed for adequate playback.
- Then, you will want to place the needle wherever you wish to start listening from, though I might suggest that, if this is one of your first attempts at using a turntable, that you place the needle at the beginning of the record, on the outer edge of the record. However, if this is all a bit much to begin with, do not hesitate to use any of the auto cueing features that might be present on the turntable.
- At this stage, upon hearing the record, you will either want to splay out in resplendence or otherwise make any tonal adjustments on the amplifier and / or receiver before doing the former.
Final Tones
So, there you have it! Hopefully you are at least somewhat the wiser about the in’s and out’s of the turntable in general and of your own in particular. Perhaps you simply needed a refresh of all the little parts, all of which are important, that come together to play aloud the records you so adore. Or, perhaps you are now feeling revitalised with fresh turntable setup ideas and are ready to totally reinvent your own setup. Whatever your path, I wish you the very best in your audiophilic peregrinations.
FAQs Turntable Setup Ideas
Where should I put my turntable?
The beautiful thing about record collecting is that you can make so many of the choices yourself, the democratic power is truly in your hands. However, that being said, there are a number of rules of thumb that you are going to want to follow, at least in picking a suitable spot for your turntable. You will, for example, want to have the turntable on as level a surface as possible, a factor considered by some turntable plinths, whose legs have adjustable legs for just such occasions where it is nigh on impossible to balance a turntable properly.
What should I put under my turntable?
The ideal thing to put underneath a turntable is a level and stable surface, one that is going to provide a solid foundation while also absorbing any external vibrations that might otherwise interrupt the sanctity of the listening experience. If, however this is not possible, then there are a number of options that you might follow. If, for instance, a level surface simply is not feasible, then you can find adjustable plinth legs upon which to place the turntable. Likewise, there are plinths designed to cater more towards the problem of vibrational effects on the unit.
Do I need a receiver for my turntable?
While a receiver is not entirely necessary for a turntable setup, it can certainly open up a whole host of other options that might otherwise be unattainable. If approaching a turntable setup with a smaller amount of funds, then a receiver is not required, for you can set up a simply stereo unit with a turntable, no questions asked. However, if you are looking to properly treat the audio after it has been processed by the cartridge through the turntable, then a receiver / amplifier in between the speakers and turntable is going to be a must.
Does turntable have to be perfectly level?
While it is definitely preferred, it is not entirely necessary, though it is certainly something that will need to be remedied with a piece of external equipment. Some turntable plinths even come with adjustable legs that can, thus, be fiddled with so that any undesirable aspects of the surface upon which the turntable is placed are combatted and remedied. If a turntable is to be played on an uneven surface without any external help, then it is almost certainly going to be knocked off kilter repeatedly, leaning this way and that as a result of the lack of balance.